

Over the past numerous months I have wasted too many hours trying to come up with a plan regarding the CB160 instrument cluster. It is not as easy and straight forward as one may think. I am torn between keeping the factory headlight integrated cable driven speedometer and replacing the instrument, and headlight, with an aftermarket assembly.
Here is my dilemma; the factory speedometer is just that, a speedometer. I would love to have a tachometer paired up with the speedo. Second issue is the speedometer drive cable coming off the front wheel. I am working toward a fairly clean looking bike and I have a hard time coming to terms with that speedo cable drooping towards the front hub. I realize I have a brake cable too that shows however that one is a keeper. In the case of the speedo cable there are options. The third issue is the factory gasket that seals the factory speedo into the factory headlight. The one I have is in average condition considering it’s almost 50 years old however it is far from perfect. New ones can’t be had. I could come up with a different solution however this is one more reason to explore the aftermarket option.
I feel as though I have looked at every aftermarket motorcycle gauge that exists. I am now very familiar with the fact that Harleys only need a tach that reads to 8000 RPM, knowing that I can usually figure out that I am on the wrong website fairly quickly. I have a lot of criteria that needs to be met in and aftermarket unit. First it needs to look retro, it also needs to use an electronic speed sensor and not a mechanical cable driven one. If the speedo is analog it cannot read too high, the CB160 maxes out around 130kph and therefore a 200kph+ gauge would not “fit” the bike. The engine revs to 10500RPM and therefore if I find a tach it would have to fit that range. Proper size is an issue as it needs to suit the bike as well as depth is a factor.
I had looked at the German built Motogadget gauges awhile back but as soon as I saw the price I promptly exited the website. Well it turns out that after exploring all of the other options out there it was time to reopen the Motogadget site, take a deep breath, and continue to keep an open mind.
As I continued to research it would appear that the Motogadget line of gauges fit most of my crucial criteria. I was able to get a tach unit with an electronic speedo. Now I realize that the electronic speedo goes against the retro look however the display is dark and very inconspicuous. The digital speedo solves my problem of having too high a max speed showing which is what I would have with an analog gauge. The second thing to consider with the Motogadget tach is the available RPM ranges. You can purchase 8000, 10000, or 14000 rpm units. At first I considered the 14000rpm option thereby allowing me to use all 10500rpm the engine was designed for. After further thought I decided that the 10000rpm option would be the way to go as I would be able to use the entire RPM range of the gauge and the giggle factor of watching the needle whip about was too much to pass up. That would mean I would be 500 rpm short of redline but sacrifices sometimes need to be made.
This brings me to my 3rd crucial necessity in a gauge. The electronic speed sensor signal. The CB160 did come with a mechanical cable drive off the front wheel. As I mentioned I want to do away with the cable. So in order to keep a clean look to it all I started to explore GPS based sending units. There were three that I looked at, the SkyDrive, one that VDO gauges distribute, and the Veethree. There is too much information for me to cover so I’ll jump to the end. After much research and many emails I was unable to determine if the Motogadget gauge would work with a GPS based sender. Even after all the research it still came down to a gamble. The worst part is the gamble included a very expensive gauge that would become useless to me if I couldn’t get the electronic speedo to work. Anyway…more on all this later.
It finally came down to crunch time. Either I needed to stick with the stock set up or suck it up, roll the dice, and order up some components to see if I could make things work in my favor. I decided that I would put some more wear on the Visa card and therefore place some orders. Even though I was prepared to commit, my problems were still not over. It was clear that there are not too many reputable suppliers of Motogadget products in North America. I could find no one that I felt comfortable placing an order with. I opted to visit a local Harley Davidson dealer as they were listed as a supplier. They were able to supply me the gauge, special ordered, however based on their estimate they provided it was clear that I was being taken advantage of. I continued my online search. Just when I thought I was going to have to place an order with a “questionable” supplier I stumbled upon Revival Cycles. Fantastic! Revival Cycles is a smaller custom motorcycle shop based out of Austin Texas. I enjoy dealing with the smaller shops as the people who work there are typically just as passionate about bikes as I am. They perform modifications similar to what I have got myself into as well as they supply parts including Motogadget. Plus their pricing on the gauge was more than reasonable.
So the order was placed with Revival, the communication was great, the transaction smooth, and the product showed up right on time. I had also ordered the Veethree GPS sender from a different supplier. Once I had both the gauge and the sender in my greasy hands I was able to see if all my research, and gamble, paid off. Well read on…
I do not typically do product reviews on the blog however I am making an exception this time. The reason being that I could not find the information out in the cyber world that I am providing here. Some of the information, and repetitive looking pictures, that are to follow may not be very exciting to many of you. What I am trying to accomplish is the relieve others of the painful amount of research that I forced myself to undergo. I am not going to cover everything, there is to much. If you have questions or want clarification just send me a comment. Specs can be found on the manufacturers website. The pictures will do the explaining. I also included a couple of fun videos just to try and some excitement to an otherwise mundane picture posting.

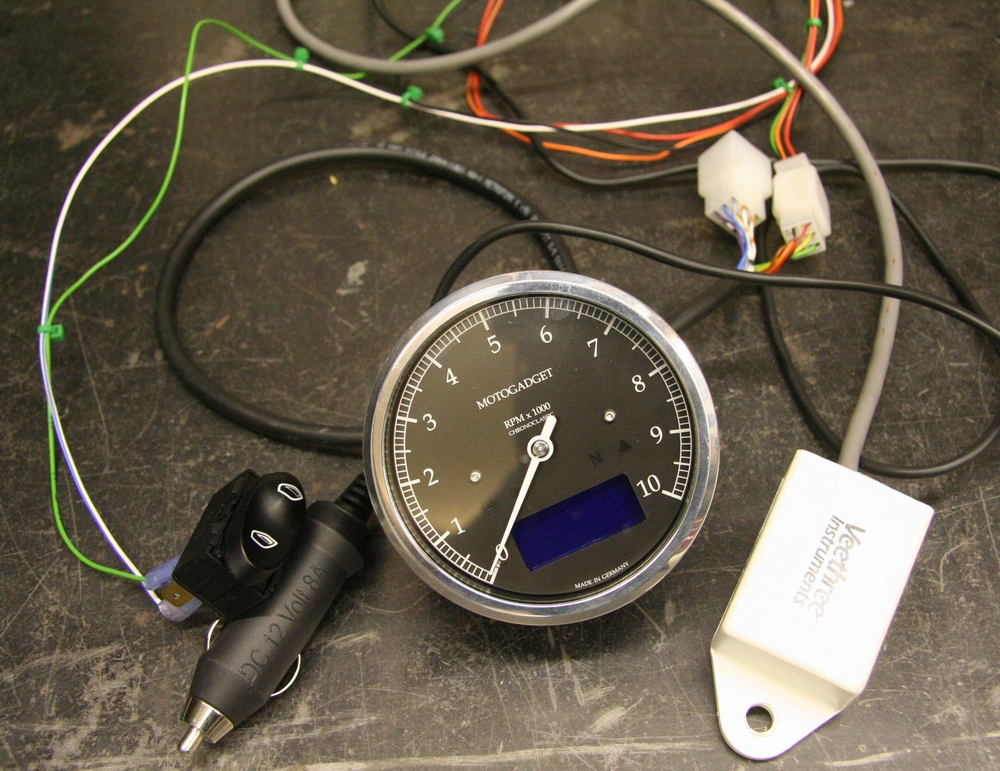
Motogadget’s Chronoclassic 2004060 gauge featuring a 10k RPM scale, dark display and polished rim. There are 2 LCD options available, green and dark. Motogadget states that the dark may be hard to read in direct sunlight. I opted for the dark in order to hide the fact that I have modern technology on the bike when there is no power. The gauge incorporates 4 lights. Turn signals, high beam, neutral, and an optional red that can be tailored to your needs. I believe the red can also be programmed as a shift light, I still need to read up on this.

Veethree instuments GPS speed sensor. The company is tailored more towards marine applications. This particular sensor they offer is a 8/16 pulse sensor which is similar to standard electronic speed sensors. The sensors can be wired either as an 8 pulse or 16 pulse depending how 1 wire is connected. The company states the gauge can be mounted in multiple directions and even under dashboards. In my case the sensor will be hidden under the seat cowl section.

The rear of the gauge is easy to work with. It comes with three drilled and tapped 4mm mounting holes. The harness is hard wired into the back of the gauge and incorporates 2 connectors to hook up to the bike harness.

The width of the gauge was a another crucial feature for me. I need a shallow gauge and at just over 1.250`deep the Motogadget should fit nicely.

This shot is taken purely to demonstrate the backlight. It’s a clean white light with just the right amount of glow. Ignore the LCD display as it is overexposed purely due to the photography. The LCD is very clean to read.
Since I wasn’t sure if this was all going to work I decided to wire the gauge and speed sensor up to a standard 12V power outlet plug. This way I could drive around in my car and test the gauge, sensor, and functions. The computer functions of the gauge are accessed through a momentary switch connected to ground. I used a window switch I had laying around as my temporary “select” button.

So here we go. The following wack-o-pics is demonstrating many of the gauge screens in the order they are displayed. Primary screen consists of 2 line display. Top is always speedo and the bottom can be changed with a push of the button. I am pleased to say the speedo works great with the GPS sensor. It took some work to get it calibrated. The Motogadget is designed to be able to enter in wheel diameter and pulses per revolution. It also has a separate function that allows you to put it into self calibration mode. This consists of driving at 50kph for 10 seconds. In my case I used my Garmin GPS and set the vehicle cruise control to 50kph to perform the 10 second calibration. After calibrated the Motogadget speedo reads identical to my Garmin GPS. This is the first screen showing the bottom display with the trip meter. Easily resettable by holding the selection button down for a couple of seconds.

Next menu selection is the odometer. Not too much to say here. When I initially hooked up the GPS sensor I had the gauge calibration wrong therefore the speed indicated approx. 250kph when I was only going 30kph. So needless to say the odometer racked up the mileage quickly. There is a function for resetting the odometer to 0.

3rd menu item is trip time. Again resettable just like the trip meter by holding the selection button down for a couple of seconds.

This menu item makes me giggle. I am thrilled to be able to monitor system voltage. The Honda CB160 has an archaic type charging system. I have been very carful when adding non-factory electrical components to the bike to ensure that the electrical system will be able to handle the load. With the Motogadget I am able to monitor the charging system, this is the screen which most of my riding will be done with.

There are optional sensors available that are not included with the gauge. This one obviously being air temperature. I haven’t decided if I am going to add one yet. The gauge can be programmed to switch from Celsius to Fahrenheit.

Next optional sensor being oil temperature. I won’t be adding this one.

3rd optional sensor is oil pressure. The gauge can be programmed to switch from Bar to PSI.

This function is sort of cool. It measures the speed of acceleration (+) and deceleration (-). It works purely off the vehicle speed sensor and reads in meters per second squared. The gauge can not be switched to G Force however mental calculations aren’t bad. 9.81 m/s2 is the speed of gravity and therefore equates to 1G.

If you choose to the engine RPM can also be read from the second line. Not nearly as cool as watching the needle whip about.

Here the average ground speed is recorded during all trips since last reset. Again, reset is done by holding the selection button down for a couple of seconds.

Here comes the fun part. 0-100kph acceleration times. When this menu item is selected you can have the gauge automatically time your 0-100kph. With the vehicle at a standstill holding down the selection button for a couple of seconds puts the option into “ready” mode. Once the gauge senses vehicle speed the timer starts and then automatically stops at a 100kph. The time is then stored.
So this brings us to intermission where the half time entertainment will begin. Just for kicks I thought I would video some 0-100kph runs. I built a very crude holder to mount the gauge and a GoPro video camera to and then took the setup out in a couple of vehicles to see just how well this Motogadget function works. So let`s start first by watching a couple videos, I`ll then recap. BTW, turn the volume up and open the videos up to full screen. You`ll want to watch the LCD readout of the Motogadget gauge, having it on full screen helps to see it. I will apologize now for the glare off the gauge glass. I did what I could, it`s not great but it works. One thing to note about the speedometer in the 2 videos is how smooth the reading is. I like that the speedo cycles fast and clean through the speeds and doesn’t jump in increments with quick acceleration or deceleration.

This is my crude mount I whipped together as fast as possible. This way people won`t get nauseous from camera shake.
So there you have it, a brief demonstration of the 0-100kph feature. Now wait! DO NOT send me any comments about how the feature isn`t accurate. I know the Porsche does not do a 2.8 second 0-100 (it is spec`d at around 3.5) and I realize the speedo starts to register late after the launch. Here is the issue (I think)…the Veethree GPS sensor samples every 1/10th of a second therefore the accuracy that would be required for fast runs just isn’t present with the GPS setup. I would be interested to know what results could be had from the same tests but instead of using GPS use a factory electronic speed signal or the magnetic reed switch the Motogadget is supplied with. Anyway…I didn’t purchase the gauge for the 0-100kph function and will only use the feature for fun so the decreased performance I get from using the GPS is not a factor for me.

The last 4 menu items consist of a memory function which stores maximum data. In this case the maximum speed is displayed and stored until it is reset.

Here you get maximum stored engine RPM. I have yet to hook the gauge up to the tach function. I suspect the 838RPM that is stored here was from factory testing.

Maximum positive acceleration. Like I mentioned earlier 9.81 m/s2 is equal to 1G.

Maximum negative (braking) deceleration. There is one more menu that can be added which is a gear indicator. It displays gears 1 to 6 on the left hand side next to the ground speed. This feature is added using the parameters setup menu. What is cool is that this function is pure mathematical as it calculated the gear based on ground speed and engine RPM, no external input to the gauge is required.

So up to this point all the user functions from the home screen have been covered. The following pictures all show behind the scene sub menus used for customizing and calibrating. To enter this menu the selection button needs to be pressed for around 3 seconds. Once in this menu the selection button is again used for navigation and programming. I am not going to cover everything in the next few pictures rather I’ll just offer a brief overview of what is available.

The SCREEN menus allows the user to turn off or on any of the main screen displays. For example I will not be installing an oil temperature sensor therefore I can turn that display off allowing me to cycle through only the menu items I choose. This menu also allows you to add a second trip meter if desired.

This menu allows the user to change the contrast of the LCD screen in steps from 0 to 6.

The damping menu allows the user to fine tune the analog pointer. If the analog indicator is oscillating strongly the damping feature can be changed in steps from 1 to 9.

This menu allows the user to enter many different parameters. There is a total of 9 submenus in the parameters feature. One includes setting wheel size and number of impulses per wheel rotation. In my case I didn’t have to mess with this as my GPS is dead accurate independent of gearing and wheels. Other items in the parameters section include tach programming, speedo km or miles, gear indicator teaching, redline teaching, and gauge software info.

This menu allows for customizing of all the sensors displays including bar or psi, Celsius of Fahrenheit. You can also choose how many digits you want displayed.

Here the master rest function can be accessed. In my case I will perform the complete reset once the gauge is installed and the bike is ready for the road. I suspect I will need to reteach my GPS speed input.

Mounting of the Veethree GPS speed sensor will end up in the tail section under the seat cowl.

