

Awhile ago my daughter asked me if I would take her to a certain bath products store so that she would be able to purchase some bath soaps and lotions as a mother’s day gift. This year she showed some initiative in getting something organized for mother’s day so I wasn’t about to deny her some transportation in order for her to execute her plan. When we got to the store I browsed the shelves while my daughter spent all her time smelling every product and deciding what her mom would like the best.
As I enter any retail store I can not help but become obsessed, and fascinated, by the marketing that businesses implement in order to get their products sold. I find it interesting that the cost of a product can drastically increase based on how it is packaged and marketed. It sometimes seems like the substance of the product is irrelevant but if you can make it visually, and emotionally, appealing then people will want it and want to pay for it.
This brings me to my latest garage adventure. I always build things that I find interesting to me. I do not sell my products and certainly do not put any value on them. However I decided that I would take a relatively simple object that I have built in the past and enclose it in some custom packaging to give it a more finished appeal. I would use the marketing technique that we are bombarded by and use it to my advantage.
So this post is not so much about the item as it is the packaging. I won’t go into detail on the specifics since this post is packed full of pictures. There no excuse for you not to know how I did what I did. But I will mention this. I used a new finishing technique that I recently obtained. It is a black oxide finish used for steel. I originally bought the product so that I would have some way to protect the tooling that I sometimes build. More on this later in the post. The second thing I should mention is that this build includes, wait for it……….wood! Yes I know we are all here because we like shiny things. No need to worry or get your end mill in a tizzy, I am not converting. I had an idea and I thought that I would put Mother Nature’s finger print on the project.
The project revolves around building another bottle opener out out of a Porsche 991 GT3 spark plug. I recently obtained 6 of these plugs and therefore I am making a limited edition run of 6 openers, all slightly different. This one is 002/6. Here we go…

So the project started off by cutting off a section of 7/8 cold rolled steel approximately 5 inches long

Next the chunk got spun down to a .748″ diameter

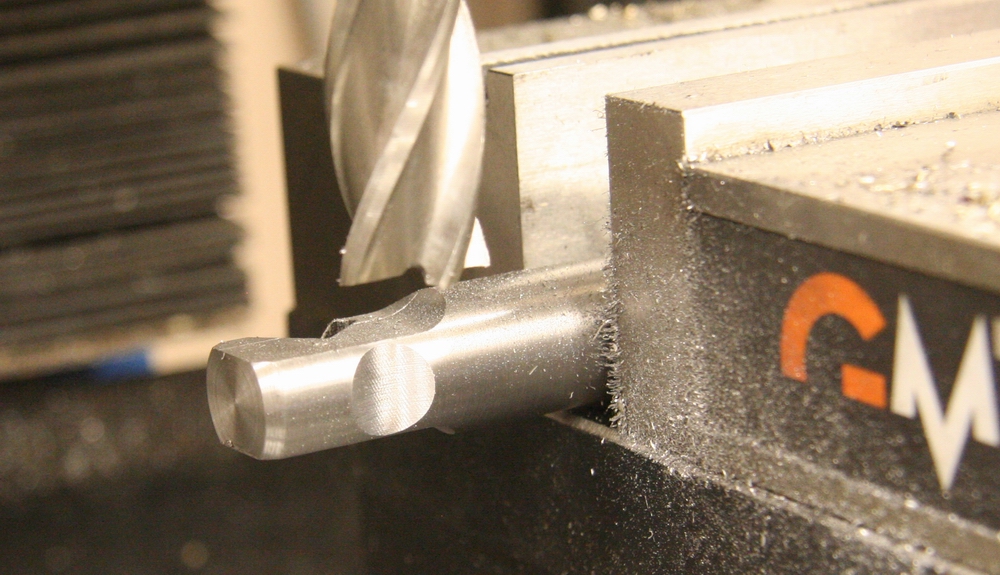
Moved onto the milling machine where each side had .130″ shaved off using a 5/8″ end mill.

Rough milling of the head of the bottle opener

Time to cut the slot for the business end of the opener. I use a 3/8″ end mill. I eyeball the angle and the depth.

Chewing out the slot.

Completed depth achieved. Those bottle caps don’t stand a chance!
Carved a thumb rest in using a 3/4″ end mill.

Jumped back onto the lathe where the opener received some cosmetic touches. I cut a couple of .040″ deep grooves spaced apart the same distance as the green lines on a Bosch spark plug.

Here is the roughed up opener just before its tail will get chopped.

With the excess material removed the opener head got drilled and threaded with a M12x1.0 tap.

A little more chamfering and clean up and the machining is complete.

Done deal, onto finishing stage.
So here we come to the part in the show where I use a black oxide finishing technique. There is a lot that can be said about this however Mr. Google already has it outlined so I will not go into specifics but I will highlight a few things. Black oxide finish is used for a number of reasons. It provides mild corrosion resistance, it gives the steel a certain appearance, and it minimizes light reflection. I started to use the black oxide for its corrosion resistance properties however in the case of this project I am using it strictly for aesthetic purposes, it gives a retro/vintage feel and look to the product.
Black oxide treatment is a chemical process that is typically done hot, around 285 degrees Fahrenheit. However there are other processes that use lower heat as well there are room temperature applications available. In my case I am using a room temperature black oxide kit that I purchased from Caswell Canada. You can visit their site if you want more information. The process is simple. I glass bead blast the part, dip it in the black oxide solution for approximately 30 seconds and then I drop it into a sealer. Because I am using this treatment solely for its appearance I skipped the sealing stage in order to keep the worn and retro black look. I included the following video to show just how quickly the process works.

Finished with a black oxide treatment.

This spark plug has approximately 15 km worth of combusted German petrol, Nitrogen, and Oxygen. Normally I’ll clean the plug however in this case I wanted to keep its authenticity so I opted to leave the sweet smell of carbon connected.

Completed opener attached to the Porsche 991 GT3 spark plug.

Onto the packaging. I wanted to try something new and decided to take a chance on machining a wood/metal case for the opener. I started of by machining a couple of aluminum arbors in order to clamp a chunk of mother natures fibers into the metal lathe.

I am planning on using a hardwood for the case but wanted to ensure my method was going to work before attempting the final product. I chucked up a chunk of 2×4 and spun it down to a cylinder to confirm the success of the plan.

I purchased a 3/4″ cove bit for a router and chucked it up into my ER32 1/4″ collet on the milling machine. The milling machine doesn’t turn the same number of RPMs a wood router does however the test cut on a scrap 2×4 proved to work

With my R&D complete it was time to move on and build the case out of good wood. I made my way down to a local wood finishing supplier and dug my way through piles of hardwood. Where I feel perfectly comfortable going to a metal supplier and others don’t I felt awkward shopping for hardwood which I know nothing about. I had to Google FBM (foot, board measure) to figure out how to buy this stuff. Anyway…I found a section of Walnut with a beautiful grain that would work for the project.

I rough cut the Walnut on my table saw and then moved onto the milling machine to clean all the edges, and dimensions, up. Normally I like to use the proper cutter, speed, and feed, for the proper application. In the case of my wood creation I decided to wing it and use my metal CCMT indexable cutters. Turns out they work great! They are not worthy of a finishing cut but that is what sandpaper is for.

Once done on the milling machine I was now left with 2 identical sections of Walnut; 1″ thick by 2″ wide and approx. 7.50″ long.

I needed to join them as one solid block so that I would be able to machine them down. Since the ends would eventually get cut off I used carpenters glue and stuck them together.

With the 2 halves clamped into a block I needed to find the center. Most people would just “X” the end however I wanted to be as precise as possible. I squared the block up in the mill vise and then used the center finder to locate the middle.

I dropped a 1/4″ endmill into both ends in order to locate the center line of the block.

I love it when a plan comes together. Holes are perfectly centered and ready for the arbors.

If you noticed in the previous picture of the arbors, they were both machined with a centering pin which was intended to drop into the center holes of the Walnut block. This way the arbor was sure to be centered. Both end arbors were then secured using #6 wood screws.

The Walnut is chucked up in the lathe and ready to get spun down to size using, again, a steel CCMT metal cutter.

I started of with a 2″ square section of wood which needs to get cut down to a 1.250″ cylinder. I learned fairly quick that the depth of cut can be greatly increase when shaving Walnut.

Here I am half way through cutting and inspection of the process proves to be working. All 4 corners are cutting evenly indicating that the centering job of the wood on the lathe was fairly accurate.

Here I have achieved my 1.250″ diameter. a bit of 320 grit sandpaper cleaned the finish up real pretty.

I’m not going to get into detail here as what I am doing will become evident as you read on. I needed to trim the end diameters down to a small dimension. Using a part off blade worked perfect to complete the task.

Here the completed rough machining has been accomplished.

The end of the wood that were glued, and that the arbors were screwed into, have been cut off. The wood was then sanded, along the grain, by hand.

Next step was to set up on the milling machine and pocket out a section for the bottle opener to sit in using a 3/4″ cove bit.

As you will see later the case will stay closed using two 1/8″ rare earth magnets. Each wood half received a 1/8″ hole on 1 end to accept the magnet.

Here are the two completed halves all sanded and ready to accept a finish.

In order to give the Walnut a protective coating I brushed on a film of clear satin polyurethane. Once dried the finish was smooth sanded using 0000 steel wool.

With the wood complete it was time to step back into my comfort zone a machine some steel end caps for the case. Here I am starting off with a section of 1.500″ cold rolled steel. It will first get spun down to a 1.250″ diameter.

With the diameter reached I then hogged out the internals using a boring bar.

Here are the 2 rough machined end caps.

Onto the finishing stage. Both caps were glass bead blasted and then treated with the black oxide finish. Obviously the right cap is in its bead blasted state and the left cap has been treated just as the bottle opener head was.

I wanted to add a personal touch so I opted to incorporate a logo. I cut out an end cap vinyl stencil on the vinyl plotter.

Next it was centered, and applied, to one end cap. The rest of the cap was taped up to protect the black oxide finished from the bead blasting.

1 minute in the glass bead blast cabinet and then the decal, and tape, removed revealed a gordsgarage logo. What I like about this technique is that there is no evidence of a depth difference between the black oxide finish and the bead blasting. The logo feels completely flush on the end cap.

Time to jump back onto the wood section. The 1/8″ rare earth magnets, that I spoke of earlier, got epoxied into the ends of each half. I am hoping it is obvious what theses magnets are for. The idea is that they will keep the case “locked”. The magnets will attract themselves to the opposite half steel end caps. The 1/8″ size turned out to be the correct choice as they do the job of keeping the case closed but aren’t so strong that it makes opening the case feel like it’s sticking.

The machined end caps also got epoxied onto the opposite ends of the magnets.

And now there is nothing left to say. Mission accomplished. One 991 GT3 bottle opener with custom case is complete. What is ironic is that the case took 4 times as long to build as the opener.

I am thrilled with the retro and vintage look of the case. It’s all about the packaging!


Once I recovered from passing out when I saw that you not only put wood on your lathe, but also your mill, I was able to truly appreciate the finished piece.
Now…
SHUT UP AND TAKE MY MONEY!
LOL Chris, I actually cut most of the wood holding my shop vac next to the flying chips. I struggled when it came time to take pictures so unfortunately some of the wood got away from me. No harm done, I spent some time cleaning up the equipment after I was done.
Thanks!
Gord
You should create an Etsy account and put a couple of those up there and see what they fetch. I bet you could easily recoup your time and material costs.
Ha! Love the reference to Talking Heads in the tilte… and the project of corse!