

It has been awhile since I tapped the keys of my keyboard to update the internet world of the going ons in my garage. The molten is still flowing and the chips have been flying. Nothing has stopped in the garage project department.
Lots of things have happened since I last checked in. The plasma table CNC project did reach finished status and is fully functioning. I am hoping to do a post on that little adventure sometime. I have also done countless side projects and even got involved in fabricating components for a 1950s Herschel carousel restoration for the city zoo. The shop has been accumulating some new equipment, lessons are being learned, failures have been had, and progress continues to take place.
For those of you who are interested in a more informal following of my day to day workings you can always follow me on Instagram @gordsgarage.
Today’s post is following the “built not bought” theme. Years ago I rebuilt a 1965 Honda CB160 into a cafe racer. I really enjoyed the build, learned lots, and have been riding the bike now for close to 5 seasons. It’s been a blast and a great commuter. So light and nimble which makes it perfect for the city. Since I finished the 65 Revive project I had been keeping my eyes open for another bike to do. I was leaning towards a sport bike but them I stumbled upon a 1982 Yamaha SR 250, otherwise known as an Exciter. I didn’t have a very clear vision but was convinced I could turn the basket case into something a bit more usable and attractive.
This build was no different than the CB build. Every component was addressed, every bolt cleaned or replaced, every sealing surface received a new gasket, and every metal component got some sort of exterior protection. There were a lot of changes made to the bike and many components replaced and added.The Yamaha got was outfitted with numerous Motogadget components including a keyless ignition system, and all lights were converted over to LED. There is way too much to list therefore I am going to rely on the comments section to answer any questions people may have.
I have jammed in over 65 pictures below to give you an overall idea of what was involved in the transformation. The project took approximately 7 months to complete. I rode it this season with no issues. It certainly has a different feel compared to my CB160. I will let you all have what you came here for, and that is the pictures. Enjoy! I’m glad to be back.

This is what I started with. It’s an unmolested 1982 Yamaha SR250 (Exciter). The main things I look for when hunting down a project bike are no broken engine fins, no previous modifications, and no evidence of any bent frames/forks due to accident damage.

I start with the engine rebuild as the internals are somewhat of an unknown. I never heard this engine run but was told it was in running condition when parked. It stripped apart nicely with no major challenges.

Once every single engine component has been taken apart it’s time for the cleaning process to begin. The gasket sealing surfaces get taped off before getting sent through the bead blaster.

Cleaning components is time consuming but also highly satisfying. Getting all the grease and oil off and then down to clean bare aluminum is required for the refinishing stage.

Once all the components are clean a thorough inspection of everything can be performed. On my previous Honda CB160 build I had to deal with a blown up engine. In the case of the SR250 I was told the engine was in good shape when I bought it. Turns out this was true. There was no damage found on any of the internal components except for minor wear and tear. All it is going to get is a reseal.

Spent time powder coating the case, jug, and head. Other items received some attention on the buffing wheel. All the external hardware was upgraded to stainless steel fasteners.

With all components refinished the engine gets reassembled with new gaskets.

With the engine 100% complete it gets hauled into the mechanical room and put to rest for awhile as I tackle the rest of the bike. Still haven’t heard this thing run yet.

Moving onto the rest of the bike the frame gets stripped down, de-tabbed, cleaned, and inspected for issues. I decided to get rid of the side stand and only keep the center stand. I also cut off the hoops for the rear foot pegs. I go solo.
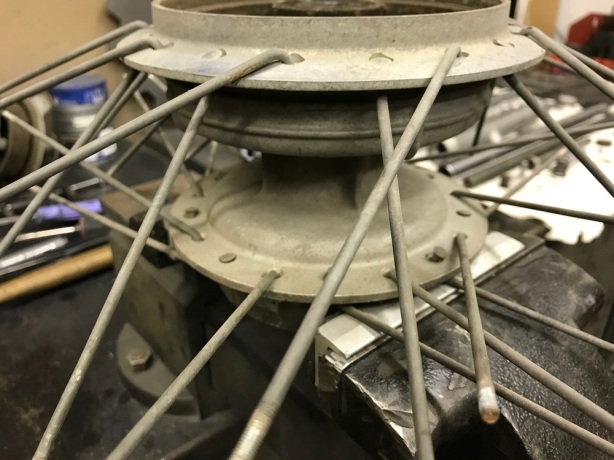
The wheels will be a major focal point. I wanted to increase both the front and rear tire sizes. This required getting rid of the factory sized hoops and lace up bigger ones onto the stock hubs. Only thing salvageable in this picture is the hub.

I was working towards getting a rolling chassis so all the components required to make this happen were stripped, cleaned, and then baked at 500 degrees in order to cook all the oil out of them before powder coating.

So both the front and the rear wheels received new Buchanan stainless steel spokes and nipples which laced up the over sized hoops also supplied by the good people at Buchanans. All the wheel powder coating was done in house.

Here is my chunky rear tire mounted onto the fresh wheel set. I went with a Avon 5.00 x 16 vintage rear tire mounted onto a 3.00″ wide rim. The front tire up-sized to a 4.00 x 18 on a 2.15″ rim.

Got the rear tire mocked up to inspect for any clearance issues. The over fitment was good. The only issue I ran into was that the cross support on the center stand contacts the tire. This would eventually get modified to gain some clearance. CHUNKY!

I wanted to make sure my vision was keeping on track so the rolling chassis got mocked up to ensure the lines were flowing the way they were supposed to. The rear shocks would eventually get replaced with new Hagons. I modified the front forks and chopped out 3 inches of travel to drop the front end down. Things are looking better.
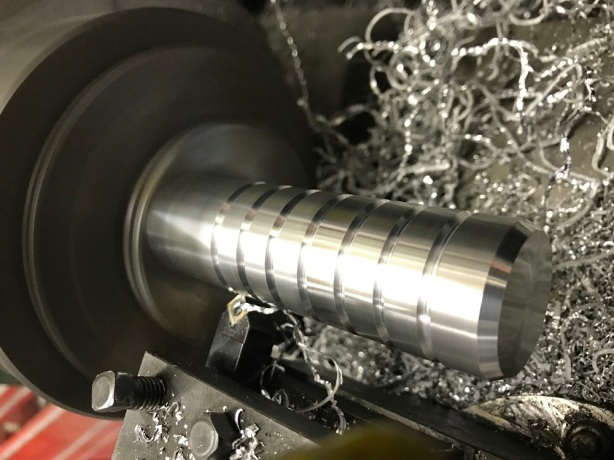
I got rid of the factory foot pegs and spun out some custom 6061 aluminum ones.

I love the clean look so there are a lot of electrical components to consider and clean up. Since I ride solo I sacrificed the passenger seat area to stashing the battery, regulator, starter solenoid, power supply relay, GPS sensor, and the Motogadget keyless ignition unit.

Staying with the times I decided to run all LED lights on the entire bike. Here is the non-DOT rear brake and signal light assembly. The signals will get coupled to a Motogadget soft flasher to give a nice blend in/out feature.

Motogadget M-blaze signal lights got fabricated in on the front. These lights are small but so bright. I machined some bezels to match the same ones built for the headlight mount.

The front headlight is also a LED unit that has an integrated daytime running light in it. The light pictures is the DRL. It’s stripe feature blends well to match the rear lights. Since I am planning this bike to only be a city ride I opted to sacrifice the high beam. I wired the factory light switch so that the low beak switch controls the DRL and the high beam switch activate the low beam.

Even the license plate got LED lights incorporated.

I used a local upholstery shop to custom sew me a full leather seat. The guy was great to work with as I ended up hauling the bike to him during the fabricating process in order to ensure I could build into the frame, and seat pan, all the required attachment points. The rear of the seat cover is attached with Velcro to allow for access to the electricals stashed below it.

With all the fab work complete it was time to strip things apart and go into refinishing stage.

All the components that would fit in my oven I powder coated in house. The color scheme included matte black and RAL 9001 cream topped with a matte clear.

With new stainless hardware and a polished steering head bolt the triples are locking great! In order to bake the powder onto the upper triple clamp I had to remove the the handlebar isolation bushings. These bushing aren’t available separately and require ordering of the entire clamp. I opted to go without the bushings and machines up 6061 aluminum bushings instead. I figured I would get better road feel. The solid bushings have had no ill effects.

The tank was stripped and the emblem pockets filled. I am not a huge fan of red but I thought the bike required some color. I opted to get the tank and headlight bucket done in Alfa Romeo A289 Rosso red and then cleared.

There was no way I could fit the frame into my kitchen sized powder coating oven so I had no choice but to source it out to a local company that I have used in the past. The owner, Dean, is fantastic to work with. I had talked to him months earlier regarding the powder. We coordinated it so that we each used the same batch of powder to ensure there would be no color match issues.
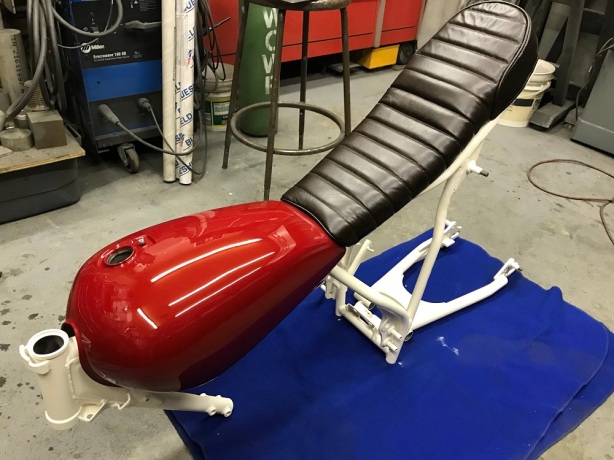
Colors are all coming together just as I planned.
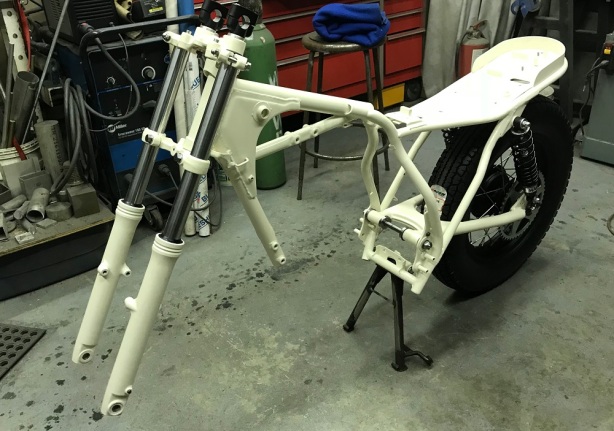
With all the components finished it was time to start with the reassembly. First thing was to get the SR standing on its own two feet.

This is the short lived stage which shows all the previous work finally coming together.

With all the main components assembled it was time to start the tedious task of routing wired and cables.

There was so much more wiring to complete on this bike compared to my 1965 Honda CB160. This bike has signal lights, and full handlebar switches. Have to start somewhere.

I just sucked it up and beat my way through days of wiring. Happy to say I nailed all the circuits 100% first time. No blown fuses, no fried wires, no smoke released.

With the bike 100% complete it is time to clean the shop up and take pleasure in another finished project.

Since it is early spring and there is still snow on the ground the bike has to wait to get ridden. With the SR in showroom condition I had my brother come by with his photography equipment and we converted the garage into a photo studio.

The set up is not pretty but the results are fantastic. My brother Brian is a wizard with this stuff.


My brother is a rider too so once the snow melted we were able to take out the fresh SR250 and run it against the 1965 Honda CB160

